

This post may contain affiliate links. If you use them, you’re helping to support this site in a small way, and we appreciate that! See our full disclosure policy HERE.
We used:
Waverly Santa Maria Desert Flower Fabric
Black Felt by-the-yard
Staple Gun and Staples
When we moved into this house several months ago, we knew we wanted barstools for the breakfast bar. We tried shopping around for a while, but had zero luck finding what we wanted in our price range. Recently a friend of mine gave me a set of three barstools. They needed some work, but they were free! I decided I would give them an easy barstool makeover.
If you’ve never reupholstered something, or you’ve never reupholstered bastools specifically, this is the post for you. I will give you step by step instructions for how to easily reupholster any chair seat, and specifically how to reupholster a barstool. This easy barstool makeover made a drastic difference in these chairs, and I love how they turned out!

The wood on the backs of these was also damaged cosmetically. I decided to shabby paint them, to add some color, and to match the table we have in our living room (you can see that table HERE). Since the pieces were so small, it didn’t take long. I unscrewed them from the chair itself, painted them, then put them back on.

I used American Paint Company paint and wax to paint these chair backs. To see a full tutorial on how I shabby paint these using water, you can check out this post HERE. Each one of the three barstools is different and has it’s own character. I really love the way they turned out! Here’s a video if you need that too:

If you’re doing multiple, and you have a directional fabric (as in the pattern goes one direction) be sure to line the seats up facing the same way for when you cut. Unless the fabric is gross, or super smelly, I just leave the old fabric on. I’ve used this method for years without any ill-effects.

BEFORE you cut anything, make sure you like up the seats, and pull the fabric up around the sides. We did this multiple times before cutting, because the fabric I was using was expensive, nd was a leftover piece from my living room curtains. You should have about an inch or more of fabric to staple into, as shown in the pic above. Once you have it lines out, cut it.

Use a staple gun, and some awesome heavy duty staples, and staple the fabric around the bottom of the chair. Be sure you’re far enough away from the edge to be stapling into the wooden bottom of the chair, and not into the cushion. Start with a flat edge, then work your way around the seat. This is really a two person job. It can be done with one person, but it’s best to do it with two. One person can pull the fabric taught, while the other person staples. I am the person who pulls the fabric taught, while I yell at my husband about how he’s about to staple my finger, and my husband staples and insists he won’t staple my finger. For the record, my finger has never been stapled. Probably because I yell every time.
Corners are the toughest. Here’s where most people go wrong with corners: they want to make just a couple of pleats, staple, and move on. Don’t do that. Several tiny pleats are best, and also another reason why you should have two people work on this at the same time! After you think you have it folded so the pleats won’t really show once it’s attached back to your chair, flip it over and look at it. Keep folding until you’ve got it right. It should look something like the picture above.

Once you’re finished stpling, this should be similar to what yours looks like. When you flip it over, the fabric should be smooth, with no wrinkles or pleats visible. You’re not quite finished with your easy barstool makeover yet!

Normally, when you finish reupholstering a chair, you can leave it like the last step, and just screw the seat back on. Barstools typically show more of the bottom of the seat, and skipping this last step will make them look very unfinished and sloppy. I bought a yard of black felt (yes, they sell it by the yard, and it’s less than $4/yd) and used it as the final backing on my seats. I used one of the previous finishing liners from one of the barstools as my template, and cut three pieces out. Then staple the liners down. Felt won’t fray, so no need to finish the edges. Use a small knife, a pair of scissors, or a drill to cut a hole where the screw holes are so you can attach your seat back to the barstool!

Once you’ve done them all, they’re finished! Didn’t that easy barstool makeover make such a difference in these chairs? I am in love with how they turned out, and they add such a fun pop of color to my living room!

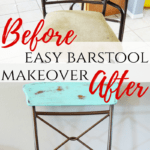
Not bad for free barstools, huh? You can do this easy barstool makeover too! This before and after shows the dramatic transformation this easy barstool makeover made. Now that you know how easy it is to reupholster, what will you customize? Send us a picture at downredbuddrive@gmail.com, if you use our tutorial, and we may post it on our social media pages!
If you liked this easy barstool makeover post, you will probably love these:
Easy DIY Curtains
Shabby Chic Table Re-Do
Stuffed Animal Corner Cage