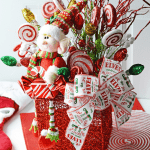

I love making my own decor (as you can see from my site) and I REALLY love making my own Christmas decor. This adorable Elf Christmas Box was a breeze to make, and I’m in love with how it turned out!
I made this Elf Christmas Box after seeing similar ones at a Christmas shop in Tennessee. Those boxes sold for $75 and up, depending on the size, and I knew I could make a custom one for far cheaper. So I got an empty decor gift box, and the decor to make it how I wanted for about $30, and I am super happy with it. This one would have sold for about $100 at the shop I found these at, so I saved myself about $70!

This post may contain affiliate links. See our full disclosure policy HERE.
Elf Christmas Box DIY
You will need:
Red Mesh Box (or any color really)
Cute Ribbon (I found mine at the At Home store – it’s 3″ ribbon)
Stuffed Elf (or other creature – I also found this one at At Home)
Floral Picks and Ornaments to match your design theme
Floral Foam
Twine or Raffia
Hot Glue Gun
Wire Cutters
Scissors
WANT SOME MORE CHRISTMAS DECOR YOU CAN DIY? CHECK OUT MY OTHER IDEAS HERE!

I got my box at the Christmas store from Tennessee, so I could replicate the exact thing I had seen. Realistically, you could use any square container, but to replicate what I did, you’ll need to buy this box. I bought the 8″x 8″x 8″ box and it worked perfectly as the base for my Elf Christmas Box. You can grab that box online HERE. They also have different colors if you want to choose a different design theme than I did.
I use ribbon to attach my floral foam to the inside of the lid of my mesh box. Tie it tightly for the best results.

This is what it looks like underneath. You won’t see this through the box, and the foam will help to make sure your floral stays in place like it should. I only use three cubes, because I knew I wanted my Elf sitting on one corner, and he didn’t need floral foam.

I’m gonna be real with you guys, I can’t tell you how I decide what to put where for these things. I just start sticking stuff in and roll with the punches. I did do big filler stuff in the back and shorter stuff in the front and on the sides. The best rule of thumb is to put your biggest items in first, and then fill in with your smaller items. Cut the stems on your floral picks shorter with wire cutters, so you don’t have to shove them all the way inside the box to get them at the right height.

I made sure to leave the front of the box mostly open for my elf to sit, and for my bow. I used two big safety pins to pin my elf’s hiney to the red mesh box. I decided he looked a little plain by himself, so I used an plastic candy Christmas tree ornament, took the ornament hanger off, and hot glued him to the elf. Then I positioned the elf’s hand on the candy, and hot glued the hand in place too.

Next I made a big bow with my fun ribbon I found at At Home. How I made the bow is a tutorial in itself that I will post at a later day, but after I was finished with the bow I used one of the wire stems I had cut off the floral and hot glued it inside the back of the bow like shown. I did this to make it easy to attach to the Elf Christmas Box by just sticking the wire stem into the floral foam.

I stuck my bow on the opposite corner as the Elf. This makes the Elf Christmas Box look pretty from all sides by having floral pics on the backs and sides, and having the elf on one corner, and the big bow on the other.

That’s all you need to make your Elf Christmas Box! It only took me about 30 minutes total to make, and I really love how it turned out. It’s bright and cheery and fits well in lots of places!

Outside of it being easy to make, I got to make a completely custom version of what I saw selling in a store for $100, for only $30! Since I made this, I know it’s made well and will stand the test of time so I can use it year after year.