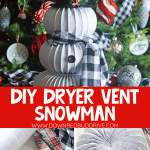


I’ve seen dryer vent pumpkins before, so I thought I could surely make a dryer vent snowman! He turned out SO cute and is a big, beautiful piece of winter home decor!

This post may contain affiliate links. See my full disclosure policy HERE.
I had the idea for this Dryer Vent Snowman, but I put off making him for two months because I wasn’t sure he was going to turn out like I envisioned.
I’m happy to report that my plan worked beautifully and he’s SO CUTE!
You don’t need a lot to put this snowman together either. I only used the dryer vent, some pieces of felt (so cheap at Walmart), scrap fabric for his scarf, and some hot glue!
If you want more snowman crafts, you’ll also love my no-sew sock snowman, my mason jar lid snowman (I LOVE this one!), and my ADORABLE snowman ornament craft!
How do you make this DIY Dryer Vent Snowman?
Step 1: Gather your supplies.

You will need:
- White Dryer Vent Hose (I got this on Amazon and it was enough to make two snowmen)
- White Felt
- Black Felt
- Big Black Buttons (I used two old vintage ones I had)
- Scrap Fabric (for his scarf)
- Hat Adornment (optional)
- Hot Glue Gun
- Scissors
- Permanent Marker
Step 2: Make your snowman shape.

I found my four-inch dryer vent on Amazon, but you can also find it at your local home improvement store.
You will need to make three circles from the dryer vent for your dryer vent snowman DIY.
The first circle needs to be the smallest. Stretch out your dryer vent hose and then wrap it in a circle shape like above the smallest you can.
It will be tight, but that’s what you want to make the smallest circle possible with your vent hose.
Cut it at the length you found, and then tuck it into itself. That will hold tight enough, but I wanted to make sure, so I added some hot glue under the edges where it connected just in case.

Repeat this step, but with slightly longer hose lengths, for the next two circles. You should end up with a small, a medium, and a large circle like shown above.
Step 3: Cut out felt circles.

You will need four felt circles total: two smaller ones, and two larger ones.
You will need two circles of felt that are just smaller than your smallest dryer vent circle.
Then you need to cut two felt circles that are slightly smaller than your middle dryer vent circle.
I used white felt so that it blended in to the color of the white dryer vent.
Step 4: Glue the felt onto the dryer vent circle.

The reason we’re using felt is because hot glue sticks to felt very well. However, if we tried to JUST glue the dryer vent to more dryer vent, it won’t work well, especially due to the shape.
Take your small felt circle and glue it to the BOTTOM of your small dryer vent hose circle.
Then glue the other small felt circle to the TOP of your middle dryer vent hose.
Then glue a bigger felt circle to the BOTTOM of the medium sized dryer vent circle.
Then glue the other bigger felt circle to the TOP of the largest dryer vent circle.
Pro Tip: Use a good amount of hot glue around the outside edge of the felt circles and press them firmly into the dryer vent shape. Make sure all the edges are glued down.
Step 5: Glue the felt circles together.

Now that you have all your felt circles glued onto your dryer vent circles, it’s time to assemble your dryer vent snowman!
Apply a liberal amount of glue to the felt circle on the bottom of the middle dryer vent circle and press it onto the felt circle on the top of the largest dryer vent circle.
Hold it down in place for about thirty seconds while the glue dries.
Then do the same with the smallest dryer vent circle.
Step 7: Make a felt top hat.

I used black felt to make my top hat.
I cut out a long rectangle of black felt to make the cylinder shape. Then cut out a circle to fit on top and used hot glue to attach it.
Trim any excess with scissors around the edge after the glue dries – this keeps you from needing to get it perfect.
Then cut a circle that’s about an inch or two bigger than that for the brim of the hat.
Glue the cylinder onto the top of the bigger circle to make the finished top hat shape.
I added a little evergreen and bow embellishment to complete the hat, but you could also add a ribbon around the brim, or a buckle, or even nothing at all.
Use hot glue to attach it to the top of the snowman head.
Step 8: Attach the scarf and buttons.

I used a piece of scrap flannel I had left from making this wood and fabric Christmas tree to make my Dryer Vent Snowman’s scarf.
I tied the scarf around his neck. I didn’t glue it in place in case I wanted to change up his scarf later.
I used hot glue to glue on the buttons to the front of him as well.

Don’t let these pictures fool you, this snowman is about two feet tall! He’s big and impressive and wasn’t difficult at all to make!
He would also be awesome to make and sell at craft fairs! The cost on this isn’t high and could have good profit margin.
I also think this would be fun to make at a ladies craft night too!

Want more Christmas DIY decor ideas?
-


CLICK HERE -

CLICK HERE -

CLICK HERE
- Button Trees Christmas Decor – This cute little Christmas craft is super fun and super unique!
- Waterless Snow Globe – This DIY Christmas craft is one of my favorite pieces of holiday decor!
- Grinch Trees Christmas Decor – Bring the look and feel of a classic Christmas movie into your home!
I can’t wait for you to make your own DIY Dryer Vent Snowman so he can start bringing you joy in your home like mine is! Happy crafting!