Holidays

St. Patrick’s Day No Bake Cheesecake

St. Patrick's Day No Bake CheesecakeSt. Patrick's Day No Bake Cheesecake

We LOOOOOVE cheesecake around here. Basically any excuse to make cheesecake is a good excuse in our book! I really love this St. Patrick’s Day No Bake Cheesecake recipe because it’s no bake, and I can change the colors up to fit whatever holiday or occasion I’m making dessert for. 

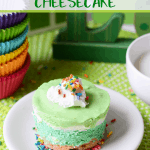
Since St. Patrick’s Day is all about the green, I made my St. Patrick’s Day No Bake Cheesecake green! They’re so creamy and delicious! You can top them with a bit of rainbow sprinkles, or even a chocolate gold coin if you want to make your guests smile. The great thing? You can make these the night before easily!

St. Patrick's Day No Bake CheesecakeSt. Patrick's Day No Bake Cheesecake

This post may contain affiliate links. See our full disclosure policy HERE.

St. Patrick’s Day No Bake Cheesecake

Rainbows and St. Patrick’s Day go hand in hand. I’ve also made THESE super popular Rainbow No-Bake Cheesecakes that you could easily make for St. Patrick’s Day too! No matter what the colors are, these are creamy and delicious. 

This recipe is designed to fit PERFECTLY in this silicone pan I found on Amazon. If you don’t want to use it, you’re welcome to use something else, but you may run out of batter, or have some left over. I’ve always wanted to try making these in little jelly mason jars too, but you wouldn’t be able to remove them from the jars and would see the colors as well, so I haven’t tried it yet.

Your batter may look runny, but don’t worry, it WILL set up just fine. I like using Keebler shortcake cookies best for this recipe and they don’t crumble as easily. 

If you don’t mind baking your cheesecake, my Mama’s Cheesecake recipe is super simple, but it THE BEST and most original tasting cheesecake I’ve ever had! Or, you can make my Triple Chocolate Cheesecake recipe if you’re like me and LOVE a good chocolate cheesecake.

St. Patrick's Day No Bake CheesecakeSt. Patrick's Day No Bake Cheesecake


St. Patrick's Day No Bake CheesecakeSt. Patrick's Day No Bake Cheesecake

Yield: 6

St. Patrick’s Day No Bake Cheesecake

Prep Time: 15 minutes
Total Time: 15 minutes

Make a delicious and festive green treat with this St. Patrick’s Day No Bake Cheesecake! It’s perfect for the holiday and easy to make!

Ingredients

  • 12 Shortbread Cookies (I used Keebler brand)
  • 1 Tablespoon melted butter
  • 1 packet unflavored gelatin
  • 2 Tablespoons of cold water
  • (2) 8 ounce packages of cream cheese, softened
  • 1/2 cup sugar
  • 1/2 teaspoon lemon juice
  • 1 teaspoon vanilla
  • Pinch of salt
  • 1/2 cup heavy cream, at room temperature
  • 1/2 cup Sweet Cream Creamer, at room temperature
  • Concentrated Gel Food Coloring
  • Whipped cream (optional)
  • Rainbow Sprinkles (optional)

Instructions

  1. Use a food processor to turn your shortbread cookies into crumbs.
  2. In a large bowl, mix the butter and shortbread crumbs together with a fork.
  3. Place your silicone baking dish on a cookie sheet and then spoon the crumb mixture into the six silicone cups. Spoon it in evenly and then smash it down firmly with your fingers.
  4. In a separate bowl, pour in the packet of gelatin.
  5. Add the cold water to the gelatin and whisk until mixed thoroughly.
  6. Set the bowl aside and let the gel harden (this will take a few minutes)
  7. Use an electric mixer and beat the cream cheese in a mixing bowl until it’s smooth.
  8. Add in the sugar, lemon juice, vanilla and salt and mix until well combined.
  9. Microwave the hardened gelatin for about ten seconds.
  10. Slowly add in the room temperature creams into the cream cheese mixture while your electric mixer is running.
  11. Finally pour the gelatin into the cream cheese mixture and use the electric mixture to mix it in.
  12. Divide your cream cheese mixture into as many bowls as you want colors.
  13. Use a concentrated gel food coloring to achieve the color you want. Do not use liquid. I simply dipped my mixing fork just into the tip of the food dye mixture to achieve the colors pictured.
  14. Pour the cream cheese mixture in, one color at a time, on top of the crusts in the silicone pan. Remember the edges are what’s going to show the color, so don’t just pour into the middle.
  15. Fill each mold to the top.
  16. Place on a flat surface in the freezer uncovered for 2-4 hours.
  17. Remove from the freezer for 30 minutes before serving.
  18. Top with whipped cream and sprinkles to finish.

Notes

  1. Don’t be afraid to completely turn the silicone mold inside out to get your cheesecakes out. They’re sturdy and can handle it!
  2. Allow these to sit for thirty mins or so before serving so they’re not frozen solid.

Nutrition Information:

Yield:

6

Serving Size:

1
Amount Per Serving:Calories: 483Total Fat: 35gSaturated Fat: 19gTrans Fat: 1gUnsaturated Fat: 12gCholesterol: 84mgSodium: 298mgCarbohydrates: 37gFiber: 0gSugar: 26gProtein: 6g


Related Articles

Back to top button